Adobe Dreamweaver Cleanup

I used Adobe Dreamweaver for probably close to a decade. I have since moved on to VSCode, but I still maintain several old sites built with Dreamweaver. Since no one in our organization uses Dreamweaver I finally decided it was time to remove the extra directories and files associated with Dreamweaver. This involved cleaning up both the server and my local Mac.

Following are instructions for removing Adobe Dreamweaver directories and files from a Windows server and a local Mac. I recommend logging and reviewing what’s being cleaned up before deleting, but if Danger is your middle name feel free to skip it.

Server Side (Windows)

Note: Server Side instructions assumes you are running the command(s) from the directory you want to clean up.

Directories (_baks,_notes,_mm,MMWIP)

Log all occurrences of the directories to c:\directories-log.txt

for /d /r . %d in (_baks,_notes,_mm,MMWIP) do @if exist "%d" echo "%d" > c:\directories-log.txt

Delete all occurrences of the directories

for /d /r . %d in (_baks,_notes,_mm,MMWIP) do @if exist "%d" rd /s/q "%d"

Files (*.LCK)

Log all occurrences of the files to c:\files-log.txt

dir /s/b *.LCK > c:\files-log.txt

Delete all occurrences of the files

del /f *.LCK

Local (Mac OSX)

Note: Local instructions assume you are running the command(s) on a directory you want to clean up located in /Users/developer/website

Directories (_baks,_notes,_mm,MMWIP)

Log all occurrences of the directories to ~/log.txt

find /Users/developer/website -name '_notes' -o -name '_baks' -o -name '_mm' -type d > ~/directories-log.txt

Unlock all files in the directories (to avoid “Operation not permitted” error on locked files)

find /Users/developer/website -name '_notes' -o -name '_baks' -o -name '_mm' -type d | xargs chflags -R nouchg

Delete all occurrences of the directories

find /Users/developer/website -name '_notes' -o -name '_baks' -o -name '_mm' -type d | xargs rm -rf

Files (*.LCK)

Log all occurrences of the files to ~/files.txt

find /Users/developer/website -name '*.LCK' -type f > ~/files-log.txt


Delete all occurrences of the files

find /Users/developer/website -name '*.LCK' -type f | xargs rm -rf

Mac Diff/Merge Utility for Dreamweaver

If you have done web development on a PC in Dreamweaver you have probably used WinMerge to check for differences between local and remote files.  Since I moved to the Mac a few years ago I have been neglectful in finding a similar tool for the Mac.  Thanks to some changes in my current day job I now have a larger team and more of a need for getting my act together on this.

The tool I have decided on in a free one called DiffMerge.  Part 1 of the install is the typical Mac install (drag a file to the Applications folder).  Part 2 is a little more detailed (but dead simple).  There is a readme.txt file in the installer image with instructions for copying 2 files to facilitate command line usage (You will need this for Dreamweaver).

Once you have done the installation and followed the readme.txt fire up Dreamweaver and click Dreamweaver > Preferences > File compare and set the path to your equivalent of the screenshot below:

DiffMerge for Dreamweaver on the Mac

Save, Format, View Dreamweaver Checked Out By Report

I wrote a post a while back about a file I created to format Dreamweaver search results for printing. Recently the need arose for me to apply that same formatting to Dreamweaver’s “Checked Out By” report.

Here is what your report will look like:

Checked Out By Report View

Download the search_results.zip file here. It contains the files to transform both “Search Results” and the “Checked Out By” report.

*** UPDATED 2/27/2015 ***

As a security measure Chrome blocks access to local files. You must open Chrome from the command line with a flag to allow access to local files.

Follow these steps to allow local file access in Chrome on the Mac:

  • If you have Chrome open, close it
  • Open a terminal window
  • Execute the command:
    open /Applications/Google Chrome.app --args --allow-file-access-from-files
  • Once Chrome opens select ‘File > Open File’ and browse to your local xml file
  • Voilà

Adobe CS4 Download File Too Large For USB Sandisk Cruzer

Adobe CS4 Download File Too Large For USB Sandisk Cruzer

Part I
I finally took the plunge and bought the upgrade to CS4 yesterday from Adobe.¬† Downloading the gi-normous 4.8 GB file was like watching my cat try to eat a chijuajua.¬† Painful.¬† I guess I could have downloaded all the trials and entered the license code, but it just feels more “official” to download the single file.¬† At $599 I need “official”.¬† Update: I moved my downloading operation to my work computer since it was dying at home.¬† Once I finally got the file downloaded though I encountered a second problem.


Part II
I have a Sandisk Cruzer (8 GB).¬† However, after trying to put the 4.8 GB file on it 10 times and getting “The disk in the destination drive is full, please insert a new disk to continue” each time I finally did some googling and realized that the problem was that by default the Cruzer is formated to FAT32 and the maximum file size for FAT32 is 4GB.¬† Here is how to reformat to NTFS.

CS4 Beta – Subversion integration does not support file:// protocol

CS4 Beta has no love for svn file:// protocol

I was really excited to see that CS4 was integrating Subversion.¬† In fact it was the main reason I downloaded the CS4 Beta.¬† At my office I am the only programmer and you’ll have to trust me when I say my only option (for a wide variety of reasons beyond my control) is Subversion on my local machine’s file system and not as a Subversion Server.

Sadly, here is the error message that tipped me off that the file:// protocol was not a possibility:

You have entered non-matching protocols.  Please check your settings.

I’m not the only one hoping for Adobe to add support.¬† Check this post as well.¬† If anyone knows of or hears about this getting changed in future releases please drop me a note.

Using Dreamweaver to work with .cfmail files

I had a BIG problem recently at a hosting company for a project I work on. They had “something go wrong” during an upgrade to ColdFusion 8 and they lost our site’s settings from ColdFusion 7. Rather than wasting valuable time trying to get them to restore a backup and redo the upgrade I forged on trying to set everything right.

One of the problems I came across was that the hosting company set the mail server to be a different one than what we had for CF7. Why did this matter? Well, there were about 300 messages sitting in the “Undelivr” folder that needed to go out. In each of those messages was the old (now incorrect) mail server info. Since I was under the gun to get the mail out I pulled them all down via FTP to parse through them with Dreamweaver.

I used this article to configure Dreamweaver to edit my extensions.txt file to be able to open and perform search and replace on .cfmail files:

http://kb.adobe.com/selfservice/viewContent.do?externalId=tn_16410

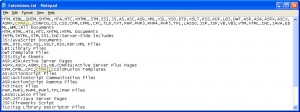
Here is a what the extensions.txt file looks like:

Dreamweaver\'s extensions.txt file

Once I got all of the .cfmail files updated, I FTP’d them back into the spool folder for re-processing. No dice. ColdFusion moved it all back to the “Undelivr” folder with a cryptic error:

The ColdFusion Mail Spool Encountered An Invalid Spool File In The Spool Directory. The invalid file MailXXXXXX.cfmail was moved to the undeliverable directory.

The next step… Hot Fix. Read about it here.

After the Hot Fix I again dropped the .cfmail files back into the spool folder for re-processing. This time… Sweet Success.

Save, Format, View Dreamweaver Search Results

For as long as I can remember I have wanted a formatted, printable report of Dreamweaver search results. Since Dreamweaver’s “Save Report” of the results pane is an xml file I have always been too lazy to pursue it. I have finally put forth a little effort to generate one using XSLT. XSLT stands for XSL Transformations. XSLT “transforms” XML documents into other formats, like XHTML.

Download the search_results.xsl file here. Unzip it. It is the file that will perform the styling of your XML results file. Hang on to it for now.

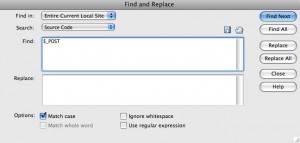
Open Dreamweaver’s “Find and Replace” window (Command + F). Enter your search criteria and click “Find All”.

.DW Finder Window

In the “Results” pane click the save icon.
DW Results Pane

You can accept Dreamweaver’s default file name or give the file a name related to your search. I’ll call mine Post.xml. Save it in the same directory where you put search_results.xsl. Open Post.xml (or whatever you called it) with Dreamweaver and add the one line of code annotated below with the red arrow.

XSL code

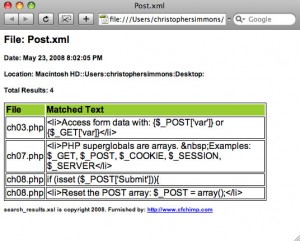
Now open your Post.xml file with a web browser such as Safari. You should see your search report formatted as follows:

Post.xml

You now have a nice printable report complete with results total.

*** UPDATED 2/27/2015 ***

As a security measure Chrome blocks access to local files. You must open Chrome from the command line with a flag to allow access to local files.

Follow these steps to allow local file access in Chrome on the Mac:

  • If you have Chrome open, close it
  • Open a terminal window
  • Execute the command:
    open /Applications/Google\ Chrome.app --args --allow-file-access-from-files
  • Once Chrome opens select ‘File > Open File’ and browse to your local xml file
  • Voilà

Comment yer code with myRev Dreamweaver Extension

myRev logo

It’s March and amazingly I have stuck to one of my New Year’s Resolutions for work. What is that resolution you may or may not be asking? …Comment my frigging code.

Several years ago I fooled around with making a few little Dreamweaver Extensions. I pulled out an old one, dusted if off, pimped it up, and am providing it here for your benefit. It’s called myRev and it will insert a comment header for you (ideally you would insert it at the top of the page you are developing). Here is a sample of the output:


<!---
============================================================
File: SomeFile.cfm
Author: Christopher C. Simmons (CCS)
Date: 3.4.2008
Purpose: To perform some calculations
History: 0.1 Initial Release
============================================================
--->

You can use it with Coldfusion, PHP, CSS, JavaScript, or HTML. The header knows what comment style to use based on your choice in the Extension’s UI.

Here’s the fine print…

csimmons.net, LLC supplies this software AS IS and makes no guarantees for your use of it. csimmons.net, LLC is not responsible for any damage or pain the use of this product may cause you.

GET IT HERE (or by clicking the myRev icon above). To install it just unzip it and double click the myRev.mxp file. The Dreamweaver Extension manager will then install it.