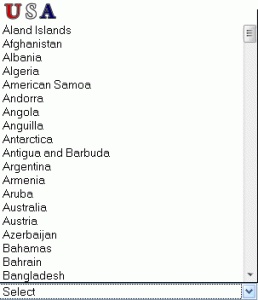
I¬recently received a¬request from a management member to put “United States of America” at the top of the countries dropdown list for our user registration process.¬ While this may seem an innocuous change to that person we do have a lot (maybe 1/3) of users not born in the U.S.¬¬ I know it used to be popular to put the good¬ole¬U S of A atop of dropdown lists for its vast superiority “convenience” but it seems somewhat “politically incorrect” or “imperialistic” to me.¬ Any thoughts?
Developer
Who’s down with OPPM
I have struggled for some time now with an expanding workload.¬ I direct a lot of projects for a couple of different business entities.¬ Since I have yet to find a way to disrupt the time space continuum and add more hours to the day I am ever searching for ways to stay focused and cram more into a 24 hour day.
Enter the OPPM.
The OPPM (One Page Project Manager) is the most effective tool I have found yet for project tracking/communication.¬ The real genius of it is its simplicity.¬ It literally is a one page document that can be easily interpreted by the boss, the project stakeholders, the managers, or just about anyone.¬ All you need is about 2-5 minutes to explain it to them once.¬ Where can I get more information you ask?
The OPPM (One Page Project Manager) website is a good start.
Then buy the book and read it.¬ The one I read is the one specifically geared for IT projects.¬ It’s about 125 pages and you can read it (and more importantly digest it) over a weekend.¬ Actually, once you read the first two chapters of the book you’ll be up and running.¬ Although I recommend reading the whole thing to learn the finer points.¬ I found the analysis of team member personalities very interesting (I’m the one with lots of unfinished books on the nightstand).
“But dude”, you say.¬ “I just dropped a wad of cash on MS Project.”¬ Don’t fret my friend.¬ You probably still need it to manage the nitty gritty.¬ And don’t throw out your Outlook task lists.¬ You can still use them.¬ The OPPM is meant to augment standard project management tools and methods.¬ The power of OPPM shines in meetings when people actually UNDERSTAND what is going on with the project without having to be a PMP.
Get it.¬ Use it.¬ You will be glad.
ColdFusion Idol Worship
When I was a kid I idolized athletes. In college I idolized musicians. As a middle aged dude I idolize superior programmers.
Today I achieved something I am very excited about. I got a couple of lines (and one of those is a comment) of code included in one of Ray Camden’s projects at RIAForge. The project is GoogleCal. It’s a ColdFusion CFC for interacting with Google’s Calendar service. My tiny, wee contribution: helping to submit an “all day” event. It is such a small, small, small, small, small (keep going), minuscule piece of Ray’s project, but just to be able to contribute ANYthing to someone who gives so much to the CF community is freaking AWESOME.
Using Dreamweaver to work with .cfmail files
I had a BIG problem recently at a hosting company for a project I work on. They had “something go wrong” during an upgrade to ColdFusion 8 and they lost our site’s settings from ColdFusion 7. Rather than wasting valuable time trying to get them to restore a backup and redo the upgrade I forged on trying to set everything right.
One of the problems I came across was that the hosting company set the mail server to be a different one than what we had for CF7. Why did this matter? Well, there were about 300 messages sitting in the “Undelivr” folder that needed to go out. In each of those messages was the old (now incorrect) mail server info. Since I was under the gun to get the mail out I pulled them all down via FTP to parse through them with Dreamweaver.
I used this article to configure Dreamweaver to edit my extensions.txt file to be able to open and perform search and replace on .cfmail files:
http://kb.adobe.com/selfservice/viewContent.do?externalId=tn_16410
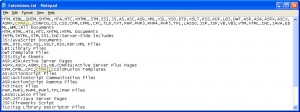
Here is a what the extensions.txt file looks like:
Once I got all of the .cfmail files updated, I FTP’d them back into the spool folder for re-processing. No dice. ColdFusion moved it all back to the “Undelivr” folder with a cryptic error:
The ColdFusion Mail Spool Encountered An Invalid Spool File In The Spool Directory. The invalid file MailXXXXXX.cfmail was moved to the undeliverable directory.
The next step… Hot Fix. Read about it here.
After the Hot Fix I again dropped the .cfmail files back into the spool folder for re-processing. This time… Sweet Success.
Enabling SSL on the ColdFusion 8 built-in web server
This tutorial assumes default install location for ColdFusion 8 on Windows XP.
The first thing you need to do is to create a keystore. This can be done with the keytool utility. I used the one that is part of ColdFusion 8.
Open a command prompt.
Execute the following command:
cd C:\ColdFusion8\runtime\jre\bin
Create the keystore with this command:
keytool -genkey -dname "cn=127.0.0.1, ou=CF, o=cfchimp, L=Decatur, ST=GA, C=US" -keyalg rsa -keystore mykey
If you have previously configured a keystore you might run into this error:
keytool error: java.lang.Exception: Key pair not generated, alias already exists
If you got the “already exists” error run this command to list the keystores:
keytool -list -v | more
If you got the “already exists” error run this command to delete the keystore:
keytool -delete -alias mykey
If you got the “already exists” error re-run the command to create the keystore.
Enter in a password when prompted (2 times)
Move the keystore file (mykey) to C:\ColdFusion8\runtime\lib\
Edit the config file C:\ColdFusion8\runtime\servers\coldfusion\SERVER-INF\jrun.xml with an xml editor of choice. This file is VERY sensitive so be sure to not screw up the syntax of it. You should probably make a copy of it before you edit it.
<!-- Uncomment this service to use SSL with the JRun Web Server

Note that you MUST create your own keystore before using this service -->

<service class="jrun.servlet.http.SSLService" name="SSLService">

<attribute name="enabled">true </attribute>

<attribute name="interface">* </attribute>

<attribute name="port">9100 </attribute>

<attribute name="keyStore">{jrun.rootdir}/lib/mykey </attribute>

<attribute name="keyStorePassword">mypassword </attribute>

<attribute name="trustStore">{jrun.rootdir}/lib/trustStore </attribute>

<attribute name="socketFactoryName">jrun.servlet.http.JRunSSLServerSocketFactory </attribute>

</service>
Restart the ColdFusion8 application service.
Create a test page in the ColdFusion 8 wwwroot and opening it in a web browser using: https://127.0.0.1:9100/testpage.cfm
You should be good to go.
REFERENCES:
For some keytool commands: http://www.instantssl.com/ssl-certificate-support/server_faq/ssl-server-certificate-java.html
Adobe instructions: http://www.adobe.com/support/coldfusion/using/ssl_with_cf_web_server/ssl_with_cf_web_server03.html
Ports in use on the Mac
Q. How do I know which ports are currently in use?
A. Run the following from the terminal window:
sudo lsof -i -P | grep -i "listen"
Save, Format, View Dreamweaver Search Results
For as long as I can remember I have wanted a formatted, printable report of Dreamweaver search results. Since Dreamweaver’s “Save Report” of the results pane is an xml file I have always been too lazy to pursue it. I have finally put forth a little effort to generate one using XSLT. XSLT stands for XSL Transformations. XSLT “transforms” XML documents into other formats, like XHTML.
Download the search_results.xsl file here. Unzip it. It is the file that will perform the styling of your XML results file. Hang on to it for now.
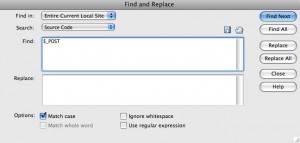
Open Dreamweaver’s “Find and Replace” window (Command + F). Enter your search criteria and click “Find All”.
In the “Results” pane click the save icon.

You can accept Dreamweaver’s default file name or give the file a name related to your search. I’ll call mine Post.xml. Save it in the same directory where you put search_results.xsl. Open Post.xml (or whatever you called it) with Dreamweaver and add the one line of code annotated below with the red arrow.
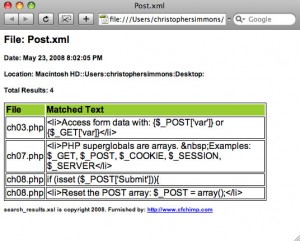
Now open your Post.xml file with a web browser such as Safari. You should see your search report formatted as follows:
You now have a nice printable report complete with results total.
*** UPDATED 2/27/2015 ***
As a security measure Chrome blocks access to local files. You must open Chrome from the command line with a flag to allow access to local files.
Follow these steps to allow local file access in Chrome on the Mac:
- If you have Chrome open, close it
- Open a terminal window
- Execute the command:
open /Applications/Google\ Chrome.app --args --allow-file-access-from-files
- Once Chrome opens select ‘File > Open File’ and browse to your local xml file
- Voilà
DOS .bat files (What I learned from writing a subversion backup script)
Comments
REM Comment Style 1

:: Comment Style 2
Set a variable
SET myCat=Dante
Output a variable
ECHO %myCat%
If then Else statement
if %yCat%== "Dante" (ECHO MY CAT) ELSE (ECHO NOT MY CAT)
Output a command’s result to a file
dir >> log.txt
Split a command across 2 lines (use ^ at the end of the line)
ECHO This is line one and ^

this is line 2.
Two commands on 1 line (separate with &)
echo command 1 & echo command2
List only directory names and no info
dir /b /ad
For-in-do (For every item do something)
FOR /F %%G IN ('dir /b /ad %repodir%') DO ECHO %%G
Virtual hosts with MAMP on Leopard
Assumptions (Kind of major assumptions):
- You are running Leopard (and therefore cannot use “Netinfo Manager” to edit your hosts).
- You already have MAMP up and running and MAMP is using the Apache config file located here:
/Applications/MAMP/conf/appache/httpd.conf
- Set up a directory for your dev website. I created:
/Applications/MAMP/htdocs/csimmons - Create a “host” for your site. In Leopard this will require you to edit the hosts file manually. Be sure to use sudo or you will not be able to save the file. Type the following and enter the root password when prompted:
$ sudo pico /etc/hosts
Add the following at the bottom
# VIRTUAL HOST START

127.0.0.1 csimmons.dev

# VIRTUAL HOST STOP
CTRL+O to write the file (then hit ENTER)
CTRL+X to exit pico - Flush the DNS cache
$ dscacheutil -flushcache - Edit the Apache config file:
$ pico /Applications/MAMP/conf/apache/httpd.confChange the following:
OLD:
ServerName localhost:8888
NEW:
ServerName 127.0.0.1:8888Continue to the very bottom of the file (use CTRL+V to page down faster) and you will find “Section 3: Virtual Hosts”. Add the following at the very end:
NameVirtualHost 127.0.0.1

<virtualhost 127.0.0.1>

DocumentRoot /Applications/MAMP/htdocs

ServerName localhost

</virtualhost>

# DEVELOPMENT HOSTS START

<virtualhost 127.0.0.1>

DocumentRoot /Users/username/Sites/csimmons

ServerName csimmons.dev

</virtualhost>

# DEVELOPMENT HOSTS STOP
CTRL+O to write the file (then hit ENTER)
CTRL+X to exit pico - Restart the MAMP servers. I just click “Stop Servers” and then “Start Servers” on the MAMP widget.
- Try it out. Point your browser to the following (no www in the address and don’t forget the port[8888]): http://csimmons.dev:8888
- Rinse. Repeat for each of your dev sites. Multiple sites would look like this:
hosts file:
# VIRTUAL HOST START

127.0.0.1 csimmons.dev

127.0.0.1 site2.dev

# VIRTUAL HOST STOP
Apache config file:
# DEVELOPMENT HOSTS START

<virtualhost 127.0.0.1>

DocumentRoot /Users/username/Sites/site2

ServerName csimmons.dev

</virtualhost>

<virtualhost 127.0.0.1>

DocumentRoot /Users/username/Sites/site2

ServerName site2.dev

</virtualhost>

# DEVELOPMENT HOSTS STOP
Subversion backup of multiple repositories via DOS .bat file
I recently had to implement Subversion at work to manage our source code. Part of that implementation was coming up with a way to automate the backup process. Since developers could be accessing code repositories at any time there is a special command (called hotcopy) in Subversion for copying a repository to another location, which you can then backup to disk, tape, etc.
I started out just doing a simple DOS .bat file to run the hotcopy. My plan was to schedule this to run in the Windows scheduler prior to the nightly backup. As I started working on the script though I found myself trying to improve it to be as generic and hands off as possible. I also wanted to backup multiple repositories.
Here are some “features” of the script:
- It will hotcopy multiple repositories in a specified directory.
- It can be run attended or unattended
- It has some basic log functionality
Here is a look at the actual hotcopy command in the .bat file:
ECHO Starting SVN backup for %%G... >> %repolog% & ^

svnadmin hotcopy %repodir%%%G %repodirhot%%%G --clean-logs >> %repolog% & ^
Download it here and rename it from svn_backup.txt to svn_backup.bat.


