ColdFusion Idol Worship

When I was a kid I idolized athletes.  In college I idolized musicians.  As a middle aged dude I idolize superior programmers.

Today I achieved something I am very excited about. ¬†I got a couple of lines (and one of those is a comment) of code included in one of Ray Camden’s projects at RIAForge. ¬†The project is GoogleCal. ¬†It’s a ColdFusion CFC for interacting with Google’s Calendar service. ¬†My tiny, wee contribution: helping to submit an “all day” event. ¬†It is such a small, small, small, small, small (keep going), miniscule piece of Ray’s project, but just to be able to contribute ANYthing to someone who gives so much to the CF community is freaking AWESOME.

Check it GoogleCal out here.

Using Dreamweaver to work with .cfmail files

I had a BIG problem recently at a hosting company for a project I work on. They had “something go wrong” during an upgrade to ColdFusion 8 and they lost our site’s settings from ColdFusion 7. Rather than wasting valuable time trying to get them to restore a backup and redo the upgrade I forged on trying to set everything right.

One of the problems I came across was that the hosting company set the mail server to be a different one than what we had for CF7. Why did this matter? Well, there were about 300 messages sitting in the “Undelivr” folder that needed to go out. In each of those messages was the old (now incorrect) mail server info. Since I was under the gun to get the mail out I pulled them all down via FTP to parse through them with Dreamweaver.

I used this article to configure Dreamweaver to edit my extensions.txt file to be able to open and perform search and replace on .cfmail files:

http://kb.adobe.com/selfservice/viewContent.do?externalId=tn_16410

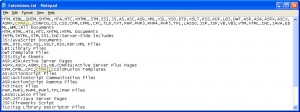
Here is a what the extensions.txt file looks like:

Dreamweaver\'s extensions.txt file

Once I got all of the .cfmail files updated, I FTP’d them back into the spool folder for re-processing. No dice. ColdFusion moved it all back to the “Undelivr” folder with a cryptic error:

The ColdFusion Mail Spool Encountered An Invalid Spool File In The Spool Directory. The invalid file MailXXXXXX.cfmail was moved to the undeliverable directory.

The next step… Hot Fix. Read about it here.

After the Hot Fix I again dropped the .cfmail files back into the spool folder for re-processing. This time… Sweet Success.
iPhone Cannot Restore Error (6) disaster averted

I was excited to download the iPhone 2.0.1 software tonight hoping it would stabilize my recently buggy iPhone 3G.  What I ended up with was this.

My iPhone hurled and was plunged into a limbo of cannot restore but cannot function.¬† I endured 3 failed attempts to restore.¬† Each ended with the dreaded “iPhone Cannot Restore Error (6)”.¬† I was using the machine I always sync it with, my iMac (iTunes 7.7.1) but I decided to roll the dice and plug it into my Macbook Air (iTunes 7.7).¬† I had to re-download the 250 MB update and restore to factory settings from the Air.¬† After that I plugged into the iMac and loaded my most recent backup.

Then I did a touchdown dance and spiked my iPhone.  Ok, not really.  Disaster averted.

To be clear I have a plain ole G3 with no jailbreak tomfoolery.

Enabling SSL on the ColdFusion 8 built-in web server

This tutorial assumes default install location for ColdFusion 8 on Windows XP.

The first thing you need to do is to create a keystore. This can be done with the keytool utility. I used the one that is part of ColdFusion 8.

Open a command prompt.

Execute the following command:
cd C:\ColdFusion8\runtime\jre\bin

Create the keystore with this command:
keytool -genkey -dname "cn=127.0.0.1, ou=CF, o=cfchimp, L=Decatur, ST=GA, C=US" -keyalg rsa -keystore mykey

If you have previously configured a keystore you might run into this error:
keytool error: java.lang.Exception: Key pair not generated, alias already exists

If you got the “already exists” error run this command to list the keystores:
keytool -list -v | more

If you got the “already exists” error run this command to delete the keystore:
keytool -delete -alias mykey

If you got the “already exists” error re-run the command to create the keystore.

Enter in a password when prompted (2 times)

Move the keystore file (mykey) to C:\ColdFusion8\runtime\lib\

Edit the config file C:\ColdFusion8\runtime\servers\coldfusion\SERVER-INF\jrun.xml with an xml editor of choice. This file is VERY sensitive so be sure to not screw up the syntax of it. You should probably make a copy of it before you edit it.


<!-- Uncomment this service to use SSL with the JRun Web Server
Note that you MUST create your own keystore before using this service -->
<service class="jrun.servlet.http.SSLService" name="SSLService">
<attribute name="enabled">true </attribute>
<attribute name="interface">* </attribute>
<attribute name="port">9100 </attribute>
<attribute name="keyStore">{jrun.rootdir}/lib/mykey </attribute>
<attribute name="keyStorePassword">mypassword </attribute>
<attribute name="trustStore">{jrun.rootdir}/lib/trustStore </attribute>
<attribute name="socketFactoryName">jrun.servlet.http.JRunSSLServerSocketFactory </attribute>
</service>

Restart the ColdFusion8 application service.

Create a test page in the ColdFusion 8 wwwroot and opening it in a web browser using: https://127.0.0.1:9100/testpage.cfm

You should be good to go.

REFERENCES:
For some keytool commands: http://www.instantssl.com/ssl-certificate-support/server_faq/ssl-server-certificate-java.html
Adobe instructions: http://www.adobe.com/support/coldfusion/using/ssl_with_cf_web_server/ssl_with_cf_web_server03.html

SVN Global Ignore Pattern

Here is an SVN Global Ignore Pattern that you might find useful:

._* .project .DS_Store Thumbs.db WS_FTP.LOG _notes _vti_* *.LCK

You implement it in the Windows world using TortoiseSVN’s settings tab. It looks like this:

For the mac you need to edit subversion’s config file:

pico ~/.subversion/config

Uncomment the global-ignores line and modify it to look something like this:

global-ignores = ._* .project .DS_Store Thumbs.db WS_FTP.LOG _notes _vti_* *.LCK _sources

Coldfusion Administrator (CFAdmin) Improperly Framed

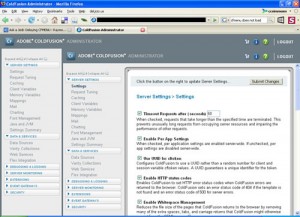
Has anyone ever logged into the Colfusion Administrator to find it improperly framed? Once you click a link in the outermost frame the problem goes away. Initially, it looks like this:

Coldfusion Administrator (CFAdmin) Improperly Framed

If you have seen this (and know how to fix it) PLEASE let me know. It has looked like this on our server at work since CF6 and I have finally grown weary of it.

Thanks!

Save, Format, View Dreamweaver Search Results

For as long as I can remember I have wanted a formatted, printable report of Dreamweaver search results. Since Dreamweaver’s “Save Report” of the results pane is an xml file I have always been too lazy to pursue it. I have finally put forth a little effort to generate one using XSLT. XSLT stands for XSL Transformations. XSLT “transforms” XML documents into other formats, like XHTML.

Download the search_results.xsl file here. Unzip it. It is the file that will perform the styling of your XML results file. Hang on to it for now.

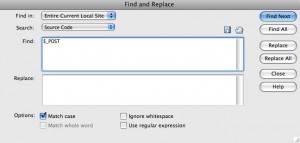
Open Dreamweaver’s “Find and Replace” window (Command + F). Enter your search criteria and click “Find All”.

.DW Finder Window

In the “Results” pane click the save icon.
DW Results Pane

You can accept Dreamweaver’s default file name or give the file a name related to your search. I’ll call mine Post.xml. Save it in the same directory where you put search_results.xsl. Open Post.xml (or whatever you called it) with Dreamweaver and add the one line of code annotated below with the red arrow.

XSL code

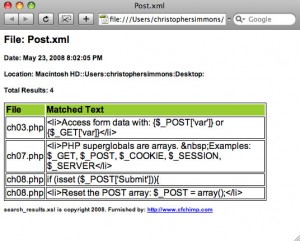
Now open your Post.xml file with a web browser such as Safari. You should see your search report formatted as follows:

Post.xml

You now have a nice printable report complete with results total.

*** UPDATED 2/27/2015 ***

As a security measure Chrome blocks access to local files. You must open Chrome from the command line with a flag to allow access to local files.

Follow these steps to allow local file access in Chrome on the Mac:

  • If you have Chrome open, close it
  • Open a terminal window
  • Execute the command:
    open /Applications/Google\ Chrome.app --args --allow-file-access-from-files
  • Once Chrome opens select ‘File > Open File’ and browse to your local xml file
  • Voilà

DOS .bat files (What I learned from writing a subversion backup script)

Comments
REM Comment Style 1
:: Comment Style 2

Set a variable
SET myCat=Dante
Output a variable
ECHO %myCat%
If then Else statement
if %yCat%== "Dante" (ECHO MY CAT) ELSE (ECHO NOT MY CAT)
Output a command’s result to a file
dir >> log.txt
Split a command across 2 lines (use ^ at the end of the line)
ECHO This is line one and ^
this is line 2.

Two commands on 1 line (separate with &)
echo command 1 & echo command2
List only directory names and no info
dir /b /ad
For-in-do (For every item do something)
FOR /F %%G IN ('dir /b /ad %repodir%') DO ECHO %%G

Virtual hosts with MAMP on Leopard

Assumptions (Kind of major assumptions):

  • You are running Leopard (and therefore cannot use “Netinfo Manager” to edit your hosts).
  • You already have MAMP up and running and MAMP is using the Apache config file located here: /Applications/MAMP/conf/appache/httpd.conf
  1. Set up a directory for your dev website. I created: /Applications/MAMP/htdocs/csimmons
  2. Create a “host” for your site. In Leopard this will require you to edit the hosts file manually. Be sure to use sudo or you will not be able to save the file. Type the following and enter the root password when prompted:
    $ sudo pico /etc/hosts
    Add the following at the bottom

    # VIRTUAL HOST START
    127.0.0.1 csimmons.dev
    # VIRTUAL HOST STOP

    CTRL+O to write the file (then hit ENTER)
    CTRL+X to exit pico
  3. Flush the DNS cache
    $ dscacheutil -flushcache
  4. Edit the Apache config file:
    $ pico /Applications/MAMP/conf/apache/httpd.confChange the following:
    OLD:
    ServerName localhost:8888
    NEW:
    ServerName 127.0.0.1:8888

    Continue to the very bottom of the file (use CTRL+V to page down faster) and you will find “Section 3: Virtual Hosts”. Add the following at the very end:

    NameVirtualHost 127.0.0.1
    <virtualhost 127.0.0.1>
    DocumentRoot /Applications/MAMP/htdocs
    ServerName localhost
    </virtualhost>
    # DEVELOPMENT HOSTS START
    <virtualhost 127.0.0.1>
    DocumentRoot /Users/username/Sites/csimmons
    ServerName csimmons.dev
    </virtualhost>
    # DEVELOPMENT HOSTS STOP

    CTRL+O to write the file (then hit ENTER)
    CTRL+X to exit pico

  5. Restart the MAMP servers. I just click “Stop Servers” and then “Start Servers” on the MAMP widget.
  6. Try it out. Point your browser to the following (no www in the address and don’t forget the port[8888]): http://csimmons.dev:8888
  7. Rinse. Repeat for each of your dev sites. Multiple sites would look like this:

    hosts file:

    # VIRTUAL HOST START
    127.0.0.1 csimmons.dev
    127.0.0.1 site2.dev
    # VIRTUAL HOST STOP

    Apache config file:

    # DEVELOPMENT HOSTS START
    <virtualhost 127.0.0.1>
    DocumentRoot /Users/username/Sites/site2
    ServerName csimmons.dev
    </virtualhost>
    <virtualhost 127.0.0.1>
    DocumentRoot /Users/username/Sites/site2
    ServerName site2.dev
    </virtualhost>
    # DEVELOPMENT HOSTS STOP